Table Of Content(s)
- Understanding Infant BLS
- One Rescuer Infant BLS
- Two Rescuer Infant BLS
- Special Considerations
- Common Mistakes
- Tips
- Final Thoughts
Basic Life Support (BLS) is a crucial set of medical procedures designed to sustain life during emergencies. Regarding newborns, knowing how to do infant CPR rescuers may literally make the difference between life and death. Particularly for the youngest and most vulnerable, the stakes are high.
Research reveals that survival rates for newborn cardiac arrests are much greater in hospitals (43%) than in out-of-hospital events (8%), therefore underlining the vital need for quick and efficient management.
Whether your role is medical professional, caregiver, or parent, knowing baby CPR might be the difference between saving a priceless life or not. Ready to unlock the power to protect the littlest hearts? Let’s explore the realm of newborn BLS and learn how your hands could turn into the most effective crisis tools available.
Understanding Infant BLS
Infant BLS is emergency treatment for newborns between the ages of 0 and 12 months. When a newborn stops breathing or their heart stops beating, timely BLS support can literally save lives. The infant BLS algorithm guides rescuers through key steps:
- Check for responsiveness
- Ask for help
- Open the airway
- Check for breathing
- Give rescue breaths
- Begin the chest compressions
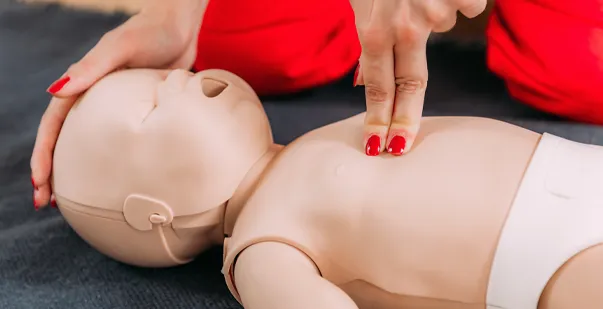
Throughout CPR, babies need less forceful treatment than adults. For chest compressions, rescuers use two fingers for their complete hand. They also give shorter breaths, just enough to raise the chest slightly.
One also needs to understand newborn anatomy for successful BLS. Heads are bigger in babies, and necks are shorter. This determines the infant’s CPR positioning by rescuers.
Since baby ribs are more flexible, they also have to be cautious not to compress too firmly. In an emergency, knowing infant BLS may make all the difference.
One Rescuer Infant BLS
Anyone who looks after children has to be able to do one rescuer infant BLS. It lets one person provide life-saving treatment when a baby loses breathing or their heart stops. Let us dissect the main elements of this essential approach.
Steps for Single Rescuer Infant CPR
Use these guidelines for an unresponsive infant:
- Before getting near the baby, consider your safety
- Tap softly and shout to see the response
- If no answer is received, contact for assistance or activate emergency services
- Spend five to ten seconds looking at the chest to check for breathing
- If not breathing normally, begin CPR immediately
Proper Chest Compression Technique
Maintaining blood flow in infants depends critically on chest compressions. Here is the correct approach:
- Lay the baby on a solid, level surface
- Use two fingers in the center of the chest, just below the nipple line
- Press down somewhere about 1.5 inches (4 cm) deep
- Let complete chest recoil separate each compression
- Keep your rate between 100-120 compressions per minute
Rescue Breathing for Infants
Giving rescue breaths is crucial for an infant CPR rescuer:
- Tilt the head slightly back and raise the chin
- Your mouth will cover the baby’s nose and mouth
- Just enough to cause the chest to lift, provide soft puffs
- Every breath should last about one second
- Watch for chest rise with each breath
Compression to Ventilation Ratio
For single-rescuer infant CPR, follow this ratio:
- Do 30 chest compressions
- Grant 2 rescue breaths
- Till help comes or the infant begins breathing regularly, keep this cycle
Remember, all the difference is in remaining cool and responding fast. Regular training and practice will help you feel more confident in executing these life-saving actions as required.
Read More: CPR vs. BLS Training: What’s the Difference?
Two Rescuer Infant BLS
Two rescuer infant CPR is a more efficient method of providing Basic Life Support to infants. This strategy’s better coordination and reduced tiredness might help increase survival chances. Let’s explore the main benefits of this life-saving approach.
Benefits of Two Rescuer Infant CPR
Two rescuer infant CPR significantly improves the chances of a successful resuscitation. It allows for better quality chest compressions and rescue breaths and less fatigue for each rescuer. Here’s a look at the key benefits.
-
Improved Efficiency
Two rescuers help distribute duties, resulting in less individual tiredness. This enables more constant, high-quality chest compressions for a long time. The second rescuer may concentrate on rescue breaths, guaranteeing appropriate ventilation without stopping compressions.
-
Better Coordination
Two rescuer infant CPR helps to smooth out breaths and compressions. Effective communication among rescuers guarantees that every action is carried out in the proper order. This coordination may result in more effective CPR overall.
-
Increased Survival Chances
The two-rescuer technique increases the chances of better blood flow and oxygenation by keeping constant chest compressions and offering timely ventilations.
Role Division Between Rescuers
In 2 rescuer infant CPR, clear role division is crucial for effective resuscitation. Each rescuer has specific tasks that ensure both chest compressions and rescue breaths are performed efficiently. Proper coordination between rescuers enhances the overall effectiveness of the CPR process.
-
Primary Rescuer
Using the two-thumb-encircling-hands method, the main rescuer’s job in two-rescuer baby CPR is to provide chest compressions. This rescuer guarantees the right depth and rate of compressions, therefore preserving a consistent rhythm to enhance blood flow.
-
Second Rescuer
The secondary rescuer is responsible for giving rescue breaths. They breathe and keep an open airway every 15 compressions. The secondary rescuer also contacts emergency assistance and runs the AED if one exists. The efficacy of two-rescuer infant CPR depends on good communication between both of them.
Read More: How Do I Get An Online ACLS Certification?
Two Rescuer Infant CPR Technique
The 2 rescuer infant CPR method is a coordinated strategy that, via shared responsibility, increases the efficacy of CPR. Use these guidelines to ensure proper execution
Assessment and Calling for Help
- Rescuer 1 gently taps the child and shouts to verify attentiveness and breathing.
- If there is no reaction and the baby is not breathing or just gasping, Rescuer 2 quickly contacts for emergency assistance and, if possible, obtains an AED.
Positioning
- Set the baby down on a firm, flat surface.
- While Rescuer 2 is ready to provide rescue breaths, Rescuer 1 stands by the infant’s side.
Chest Compressions
- Rescuer 1 uses the two-thumb-encircling-hands technique for compressions.
- Placing both thumbs on the middle of the infant’s chest, just below the nipple line, guarantees appropriate 2 rescuer infant CPR finger placement.
- Encircle the infant’s chest with the fingers, supporting the back.
Compression Rate and Depth
- Compressions should be performed 100–120 times per minute.
- Compress the chest to a depth of around 1.5 inches (4 cm), then let it completely rebound between compressions.
Rescue Breaths
- Rescuer 2 gives two rescue breaths after each of the 15 compressions.
- Tilt the head back and raise the chin to open the baby’s airway.
- With your lips covering the infant’s mouth and nose, create a good seal and gently breathe for one second each, keeping an eye on the chest rising.
Switching Roles
- Every two minutes—about four cycles of compressions and breaths—rescuers should alternate duties to minimize tiredness.
- Make sure the change preserves CPR’s rhythm.
Using an AED
- Rescuer 2 connects the pediatric pads while Rescuer 1 keeps compressions ready should an AED become accessible.
- Use the AED prompts to guarantee a few pauses in the chest compressions for the infant 2 rescuers.
Following these guidelines for 2 rescuers’ newborn CPR guarantees good coordination and increases the likelihood of successful resuscitation. The newborn’s life depends critically on the correct 2 rescuer finger placement and technique.
Special Considerations
Some circumstances call for changes to the conventional procedure while doing newborn CPR. Knowing these particular factors will enable rescuers to handle different situations with efficiency.
-
Choking Infant
Use back strikes and chest thrusts if a baby is choking and aware. Using five chest thrusts, alternate five back strokes between the shoulder blades until the item is thrown. Start CPR right away if the baby passes unconscious, then inspect the mouth for obvious blockages before delivering rescue breaths.
-
Drowning
Remove a drowning baby from the water right away. As soon as you get onto firm ground, start CPR. Unlike in previous cases, offer two rescue breaths before beginning chest compressions. This is so because the main problem in drowning is oxygen deprivation. Continue CPR with the standard 15:2 ratio for two-rescuer infant CPR.
-
Premature Infants
Premature newborns’ fragility calls for particular attention while you are doing CPR. Aim for around one-third of the chest depth, and compressions should be done with less power. One could use the two-finger technique instead of the two-thumb approach to prevent too much pressure.
-
Trauma Victims
If you believe the infant has sustained trauma, such as from a fall or car accident, minimize movement of the head and neck to prevent further injury. Throughout CPR, keep your spine aligned. As you continue CPR, apply direct pressure to the wound if there is obvious bleeding.
Common Mistakes
Under great stress, like newborn CPR, even seasoned experts may make mistakes. Understanding these typical errors in newborn two-rescuer CPR can assist in improving performance and maybe save lives. Let’s examine some frequent errors and how to avoid them.
-
Inadequate Compression Depth
One of the most common mistakes in 2 person infant CPR is not compressing the chest deeply enough. Rescuers who are too careful might be afraid they will hurt the baby. However, insufficient depth fails to generate adequate blood flow. To guarantee good circulation, always try for a compression depth of about 1.5 inches (4 cm).
-
Incorrect Hand Placement
Correct hand placement helps chest compressions be as effective as they should be. In the infant CPR 2 rescuer technique, the compressor should place their thumbs side-by-side on the lower half of the sternum, just below the nipple line. Either too high or too low hand placement might lead to inefficient compressions or perhaps harm.
-
Poor Communication Between Rescuers
Lack of clear communication might result in blunders. Rescuers should explicitly indicate when changing duties and count compressions loudly. Good communication guarantees an appropriate compression-to-ventilation ratio and seamless transitions.
Tips
Implementing these tips can significantly improve the effectiveness of infant two rescuer CPR. Remember, performing under pressure depends mostly on practice and preparation.
- Regularly practice CPR techniques to maintain skills
- CPR should take place on a hard, level surface to provide proper compressions.
- Every two minutes, swap roles to avoid tiredness and preserve quality.
- Emphasize letting your chest recoil fully between compressions.
- Keep rescue breaths light, just sufficient to cause the chest to rise.
- Remain composed and cooperate with others, clearly communicating throughout.
Final Thoughts
For our youngest and most vulnerable, mastering infant CPR rescuers is a vital ability that may make all the difference between life and death. Throughout this guide, we’ve explored the nuances of one and two-rescuer infant CPR, highlighting the significance of proper technique, coordination, and adaptability in various situations.
Remember that prompt and appropriate response at critical times may considerably improve an infant’s chances of survival. We strongly advise you to go further: look for expert instruction, practice consistently, and keep current on the most recent recommendations. By becoming proficient in infant CPR, you’re not just acquiring a skill—you’re accepting the power to save a precious life.


